


")

")

")
")

?")
If you ask me Which is the best range of Smartphones?, I’ll crown the Nexus Series.
Best-in-Class specifications and unmatched support from Google makes it one of the best range of devices.
Whenever Google unveils a new version of Android, Nexus devices are the first ones to get it. Nexus owners are the first ones who get to taste the sweetness of the new Android.
And that’s one of the reasons why it is so popular amongst the Android Fanboys.
But do you know that you can do much more with your Nexus if it is rooted?
Rooting means to get access to the superuser rights of your device. After obtaining superuser or administrative access you can do just about anything with your Android.
To Root your nexus, you need to have a Custom Recovery installed. And to install Custom Recovery, you need to unlock the bootloader of your Nexus device.
In case you want to Root your Nexus but don’t want to get into all this technical stuff, you can check out this guide on Rooting your Device without the help of a PC, in just one-click.
In this post, you’ll get to know How to Unlock Bootloader on Nexus. Read on.
Also Read: How to Unlock Bootloader on Motorola Device.
Before I begin, there are a few things which you need to consider before you move on to unlock bootloader on Nexus. They are:
- Unlocking Bootloader will void your warranty.
- After unlocking the Bootloader, all the data will be erased from your phone. It is highly recommended that you take a backup of your device.
- Unlocking Bootloader, Rooting and other advances stuff requires some technical knowledge and are not free from any problems. You phone may go into a boot loop or it may get bricked. Please proceed at your own risk. Squto will not responsible for any damage, whatsoever.
After you’ve considered all of the above points, let’s begin unlocking the bootloader.
Things you need to Unlock Bootloader
- A Nexus Device
- A PC with an active Internet Connection.
- A USB Data Cable
Are you ready?
Let’s begin.
How to Unlock Bootloader on Nexus
Devices?
There are two ways to unlock the bootloader on Nexus devices. The first one is a traditional one and the second one is through using an application.
Let’s first talk about the Traditional Method.
Traditional Method
Step 1: Follow this link and Download the latest Android SDK Platform-tools. It is available for Windows, Mac and Linux, therefore download according to your need. Once the download is finished, extract the zip file.

Step 2: Next, head over to this link and download, extract and install the latest Google USB Drivers. Google USB Drivers supports all the Nexus devices.

Step 3: On your phone, Enable Android Debugging or USB Debugging, as the case maybe.
You can do that by going into your Phone’s Settings and tapping on About. Scroll down till you find Build or Build Number. Tap on it 7 times repeatedly to enable Developer Options.

Go back to the main page of your Phone’s Settings, there you fill find Developer Options. Tap on it. Scroll to find Android Debugging or USB Debugging and turn it on.
Step 4: Power off your device and Reboot it into Fastboot mode by holding the ‘Power’ button and ‘Volume Down’ button together for a few seconds.
Step 5: Once in Fastboot mode, connect your Nexus device to the Computer with the help of a USB Cable. You’ll notice ‘USB Connected’ written on your Nexus.
Step 6: Moving on to the Computer, open the folder which you extracted in Step 1.
Hint: The folder will be dubbed as Platform-tools or something similar.
Step 7: Once you are in that folder, Hold Shift button and Right-click on an empty area within the Folder to open a pop-up. Click on Open Command Window Here.

Warning:
The following steps will wipe all the data from your phone. So double-check that you’ve successfully backed up everything on your phone.
Step 8: This will open Command Prompt. Now you need to type the following command at the command prompt:
fastboot devices
Hit Enter. You’ll see a bunch of numbers followed by fastboot written on the Command Prompt.
If this is the case, that means you’ve successfully installed USB Drivers on the PC and are good to go.
In case you don’t, go ahead and make sure that USB Drivers were installed correctly. If need be, uninstall the USB Drivers and install it again and see if it works.
Step 9: Once you are sure that you’ve successfully installed the USB Drivers, type the following command at the Command Prompt:
fastboot flashing unlock
Hit Enter. Your Nexus will start unlocking itself.
In case the above command didn’t work for you, you can try typing:
fastboot oem unlock
Hit Enter.
You’ll be prompted on your phone whether you really want to unlock the bootloader, you can confirm by using Volume buttons and Power button.
Step 9: The moment you confirm, your phone will start working on it. Just give it a few seconds. Once it is done, Reboot your device.
You can do that either by using the on-screen button or by typing the following command at the Command Prompt:
fastboot reboot
Hit Enter. Your Nexus will get rebooted.
Congratulations! You’ve successfully unlocked the bootloader on your Nexus.
You’ll have to set up your Nexus, just like you did when you first unboxed it.
If, for some reason, you didn’t like this traditional method, you can follow a more easier method.
Application Method
Step 1: Follow this link and download Nexus Root Toolkit. Install it on your Computer, once the download is finished.

Step 2: After the installation is finished, open the application. Connect your Nexus to PC with the help of a USB Cable.
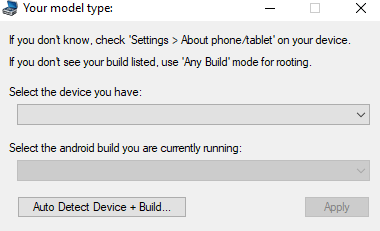
Step 3: Select your Nexus device from the drop-down menu and also select the Android version it is running on. Click on Apply.
Step 4: The application will tell you to enable USB Debugging on your phone. Follow the on-screen instructions for the same and Click OK.

Step 5: Within a few seconds, the application will come up with all the files you need. You can click on Download + Update All File Dependencies, if the application says Need to Download.

Step 6: Once all the required files are downloaded, click on Continue.
Step 7: On the next window, click on Full Driver Installation Guide and follow the on-screen instructions to download USB Drivers. Skip this step if you already have the latest USB Drivers.
Warning: The next step will wipe all the data from your phone. Take a backup of all your files before proceeding.
Step 8: Once you’ve installed the drivers, click on Unlock to start unlocking the bootloader.

That’s it! You’ve successfully unlocked the bootloader on your Nexus Device.
There you have it guys! The most thorough and the easiest guide on How to unlock bootloader on Nexus.
Were you able to unlock the bootloader? Or are you stuck somewhere? Let me know in the Comments below and I will help you out.
And don’t forget to share this article with your family and friends on your Social Networks.

")


[…] How to Unlock Bootloader on Nexus Devices? […]